Programming
the PIC 16F876 microcontroller
| Hardware To copy the hex file to the microcontroller, you can use the simple programming hardware below. It is connected to the serial port of a desktop PC and needs no external power source. Pin numbers refer to 9-pin D connector pins. The hardware has been tested and found to work on a Linux operating system (Ubuntu 8.04). JDM classic programming hardware has been used as a guideline for the schematic. Use a socket for the PIC. A 'zero force' socket provides easy plug and unplug. 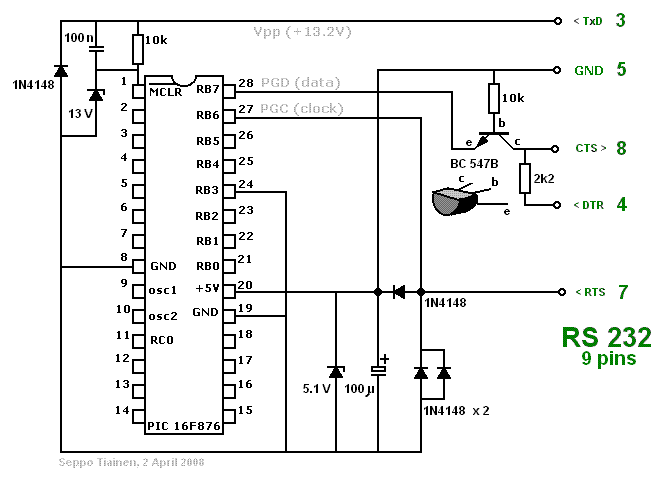 The two diodes at lower right are required in
parallel because there may be large transient currents due to the 100uF
capacitor. The 2k2 resistor is a bit critical, e.g. 1k5 won't do.
Software When programming, reading or veryfying the PIC, no other applications, like the browser, should be running because they may delay the signals so much that the process will fail. Piklab The hardware fully works with the great Piklab Linux software (Ubuntu 8.04, Synaptic) at least if you use a desktop serial port (mine is an Acer). With Piklab, you can develop your asm code, assemble it and then copy the hex code to the 16F876 PIC, and finally verify that the burning process of the hex code to the PIC was succesful. Do not forget to program the config data separately. Note 1: If you start from the hex file, you need to do the config data settings manually to reflect the values in the asm file: __CONFIG _CP_OFF & _WDT_OFF & _BODEN_OFF & _PWRTE_ON & _XT_OSC & _WRT_ENABLE_ON & _LVP_OFF & _CPD_OFF If you start from the asm file, the settings will be made automatically but need to be written to the pic however . In
Brief
install gputils (using Synaptic of Ubuntu 8.04) install piklab (using Synaptic of Ubuntu 8.04) Do these Piklab settings (since they are not default): - Settings > Configue Piklab > Standalone file: Device 16F876 Toolchain GPUtils Configuration Custom Arguments %I - Remove tick from: Settings > Configure Piklab > Programmer options: Verify device memory after programming*. - Programmer selection: JDM classic (might be default?) Reference: http://gputils.sourceforge.net/#Mplab (User Manual etc.) http://piklab.sourceforge.net/ * After programming the PIC, you may get a message indicating that verifying was not successful. However, if you run again Verify after this, it will be succesful. You can avoid this false alarm by removing the tick from: Settings > Configure Piklab > Programmer options: Verify device memory after programming. IC Prog This compact and reliable burning software is for Windows but it has also been successfully tested under Wine in Ubuntu 8.04 (beta). The exe file can be found here: http://www.ic-prog.com/ For
Linux users:
Set Wine configuration to WindowsXP for icprog.exe These changes in the default settings are required to make everything work: - Change controller type to 16F876 - Settings > Hardware > Windows API - Settings > Hardware > I/O Delay = 1 (important!) - Settings > Options > Programming > Verify during programming (If verify fails for a single byte, IC Prog seems to rewrite it) Note 2: The program code and the config data are copied to the PIC in one go ('Program all' in the menu). Seppo Tiainen, 2 April 2008 |