
|
GKOS Keyboard for Arduino Duemilanove |
| Video: The GKOS keypad used together with an LCD display. | If you are planning to build a stand-alone system where a small but full-featured keyboard is needed, this could be a quick and easy solution for you. Unpack the draft Gkos library v.1.5 (2010-04-14) for Arduino IDE, and put the Gkos folder and its contents with subfolders to arduino-0018/libraries/Gkos Below, you will find three sketches to test your GKOS wiring: - Enter text to an LCD (as shown on the demo video) - Use the Arduino IDE to show what you type - Use the on-board LED to show that the keypad works Note: The LCD unit is only required for the first sketch. |
|
| Arduino GKOS Keyboard
Pictures >> Built 21 March 2010 GKOS Home Page >> General information on GKOS Optional LCD LCD Schematic and information>> (http://arduino.cc/en/Tutorial/LiquidCrystalScroll) |
Keyboard
Schematic: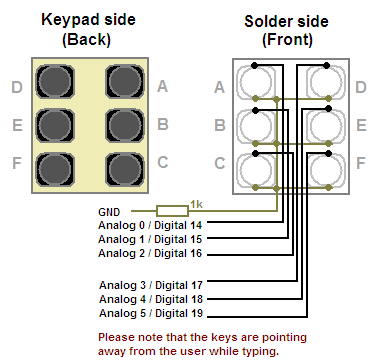 |
|
| /* Test
the Gkos library with an LCD With this sketch you can type any text on the LCD's lower line. Commands like Enter, Control, Alt etc. are just output to the LCD in format: _Enter, _Ctrl, _Alt, _PgDn, _Esc etc. How to deal with these depends on your needs. Only backspace _BS and _Esc (to clear line) are dealt with by this sketch. */ #include <LiquidCrystal.h> #include <Gkos.h> static char* gEntry = ""; static int gDone; // initialize libraries with numbers of the interface pins LiquidCrystal lcd(12, 11, 5, 4, 3, 2); Gkos gkos(14, 15, 16, 17, 18, 19); void setup(){ // set up the LCD's number of rows and columns: lcd.begin(16, 2); lcd.cursor(); lcd.print("GKOS Keypad Test"); lcd.setCursor(0, 1); // Move to second line } void loop(){ int gDone = 0; gEntry = gkos.entry(); // Will return empty immediately if no entry if (gEntry[0] != 0){ // Not NULL if (strcmp(gEntry, "_BS") == 0){ // Backspace lcd.rightToLeft(); // Looks strange but works! lcd.print(" "); lcd.leftToRight(); lcd.print(" "); lcd.rightToLeft(); lcd.print(" "); lcd.leftToRight(); gDone = 1; } if (strcmp(gEntry, "_Esc") == 0){ // Esc clears the line lcd.setCursor(0, 1); lcd.print(" "); lcd.setCursor(0, 1); gDone = 1; } if (!gDone){ lcd.print(gEntry); } } } ____________________________________________________________________
|
/* Test
the Gkos library with the on-board LED This is a simple test to check that your GKOS keypad is working, by controlling the LED on pin 13. Press "a" => LED on Press backspace => LED off Press "b" => LED blinks a while Press space => LED on for one second */ #include <Gkos.h> char* gEntry = ""; // Pressing keys: // Key A => "a" // Keys A+B+C => "_BS" backspace // Key B => "b" // Keys D+E+F => " " space int ledPin = 13; // Select the pin for the LED // initialize Gkos library with numbers of interface pins Gkos gkos(14, 15, 16, 17, 18, 19); // digital pins 14...19 are the same as analog pins 0...5 void setup(){ // use the ledPin as an OUTPUT: pinMode(ledPin, OUTPUT); digitalWrite(ledPin, LOW); } void loop(){ gEntry = gkos.entry(); // Will return empty immediately if no entry if (strcmp(gEntry, "a") == 0){ // "a" pressed, LED on // turn the ledPin on digitalWrite(ledPin, HIGH); } if (strcmp(gEntry, "_BS") == 0){ // Backspace pressed, LED off // turn the ledPin off: digitalWrite(ledPin, LOW); } if (strcmp(gEntry, "b") == 0){ // "b" pressed, LED blinks // turn the ledPin off: digitalWrite(ledPin, LOW); delay(500); // turn the ledPin on digitalWrite(ledPin, HIGH); delay(500); // turn the ledPin off: digitalWrite(ledPin, LOW); delay(500); // turn the ledPin on digitalWrite(ledPin, HIGH); delay(500); // turn the ledPin off: digitalWrite(ledPin, LOW); delay(500); // turn the ledPin on digitalWrite(ledPin, HIGH); delay(500); // turn the ledPin off: digitalWrite(ledPin, LOW); } if (strcmp(gEntry, " ") == 0){ // space pressed, LED on and off // turn the ledPin on digitalWrite(ledPin, HIGH); delay(1000); // turn the ledPin off: digitalWrite(ledPin, LOW); } // Add your other code here. // Note that gEntry is always a single character like "a" // or a keyboard function like "_Del" } |
| In
addition to letters, numbers, punctuation and
other characters,
the PC keyboard functions are indicated as shown on the right.
Note that _123abc, _Shift and _Symb are not output as such. Instead, they are used for modifying the characters before they are returned by gkos.entry(). Other GKOS keyboard projects: Interested in building a USB GKOS Keyboard for the PC? Study this: USB GKOS HID plug-and-play PC keyboard (Linux & Windows) by using the Arduino open source board with an expansion shield. |
_Up
_Down _PgUp _PgDn _BS _Left _WLeft (word left) _Home _Right _WRight (word right) _End _Enter _Tab _Esc _Del _Ins _Ctrl _Alt |